
DIY Home Improvements – Off the Hook
| June 17, 2020I love that these are so inexpensive to make and that they can be done with the kiddos

W
hile there is no denying that DIY projects are well within my comfort zone, my favorite type of project is one that isn’t too difficult to execute and has actual functionality in my home. The inspiration for these hooks came from all the odds and ends accumulating in my children’s rooms. I figured that if we created fanciful hooks, my kids might be more inclined to hang up their towels or excessive numbers of beaded necklaces!
I love that these are so inexpensive to make and that they can be done with the kiddos. And the best part? While many stores are closed nowadays, Lowe’s and Home Depot are open, and that’s where most of this was sourced.
Important note: Don’t feel pressured to follow my guidelines to the T; you can create your own hanging hooks using whatever you find in the store or at home, or whatever matches your decor.
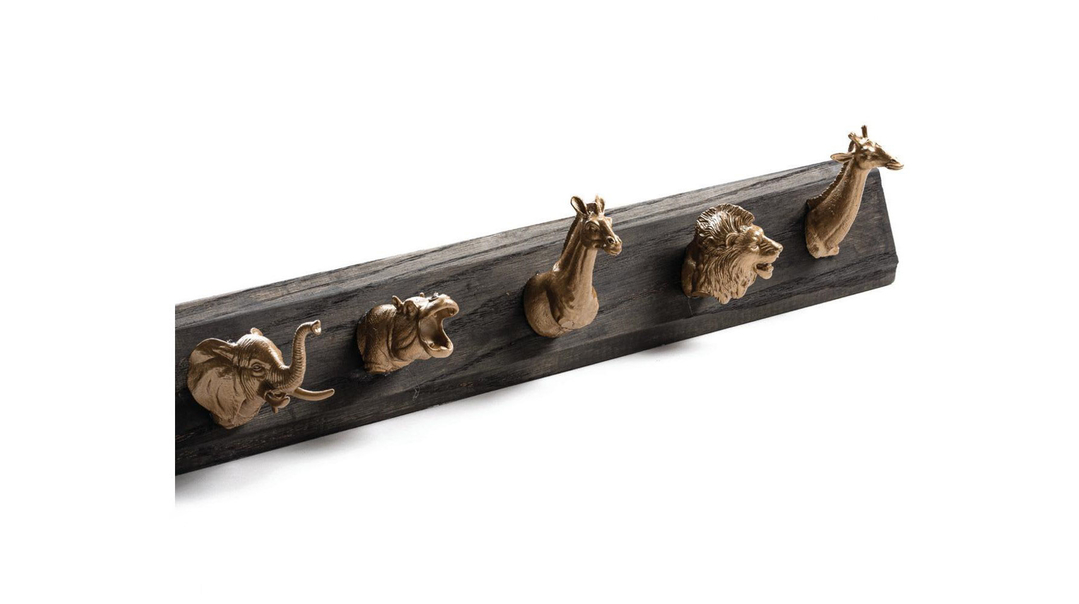
Animal Farm
For the boys’ room I chose to go with animal hooks. To achieve the stained effect on the wood, I used black shoe polish instead of wood stain, saving money and an errand in the process. I used spray paint to paint the animals, but you can use any paint of your choice.
Tip: You can even use animals from the toy box that have seen better days!

You will need:
> wooden board for the base (mine was 4 x 24 inches)
> shoe polish, spray paint, or wood stain
> plastic, wooden, or metal animals
> razor or sharp knife
> spray paint (I used gold)
> strong glue such as Liquid Nails or Gorilla Glue
plaque-hanging hardware
1. Stain the wooden board by spray-painting it or using a small amount of shoe polish.

2. Using the razor, cut the animals right behind the front legs. If you want to, you can cut the front legs off as well.

3. Spray-paint all the animals. You might need a few coats to get them fully covered.

4. When the animals are dry, measure where you’d like them to go on the board and then glue them on using Liquid Nails or Gorilla Glue. Let the glue dry according to package directions.

5. Once the glue is dry, attach the hanging hardware to the back and you’re done!

Somewhere Over the Rainbow
In the girls’ room, we went with rainbows. Instead of a wooden board, I used a floor tile that I picked up at Lowe’s for a cleaner, more updated look. I glued drawer knobs to the backs of the rainbows, let them dry, and then attached the decorated knobs to the tile. I used rainbows from a cute necklace I found in the dollar store, but you can use any wooden shape or flat item that you love.
Tip: Look for flat drawer knobs so your decor element will attach securely.
You will need:
> wooden board or floor tile (mine was 4 x 12 inches)
> drawer knobs
> plastic or wooden rainbows or any other decorative item of your choice
> strong glue such as Liquid Nails or Gorilla Glue
> plaque-hanging hardware
1. Measure where you’d like the hooks to be.

2. Glue the drawer knobs onto the back center of your decor items. Let the glue dry according to package directions.

3. Glue the knobs to the designated marks on the tile and let dry.

4. Once the glue is dry, attach the hanging hardware to the back and you’re done!

There are infinite amounts of DIYs that often appear intimidating, as well as endless accessories to add some charm to your kids’ rooms. Combining those two into a project that feels accessible yet elevated is the ultimate coup. Happy hanging!
Shainy Maiman is a content creator and stylist. She utilizes her artistic leaning by teaching art and decor in girls’ schools and summer camps, as well as creating artful fruit arrangements and watermelon carvings for sale. She can be reached via Mishpacha.
(Originally featured in Family Room, Issue 005)
Oops! We could not locate your form.
RECOMMENDED


RELATED CONTENT

Setting a beautiful table can be a spiritual act and a concrete way to welcome Shabbos.


Using chairs — vintage and new, with classic yet memorable profiles — drives home my love of all things traditional.

Beautiful shuls around the world utilize color, light, space, and history to evoke spiritual elevation

Here are some of my fundamentals when working with color and pattern

Recognizing the four seasons within design and style and how they impact your home choices