
Wood You?
| January 11, 2022This month, we’re rallying around all things wood, namely, popsicle sticks, to bring the trees indoors

Tu B’Shevat is a little gem in the middle of the winter, a great opportunity to bring sprouts of life into our homes. This month, we’re rallying around all things wood, namely, popsicle sticks, to bring the trees indoors.
How about them Apples
Driving the Tu B’Shevat theme home here, use popsicle sticks to create fruit. These apple cores are as easy as they’re charming.
You’ll need:
- Hot glue gun
- Construction paper
- Popsicle sticks
- Marker
Start by gluing four popsicle sticks together. Flip the popsicle sticks over. Cut the apple ends out of construction paper and glue on to the popsicle sticks. Add a stem, leaf, and pits to complete the apple theme!

Have a Fling
This project will keep kids of all ages busy, especially kids who love experimenting! My son enjoyed the process of figuring out exactly where to put the stack of popsicle sticks to make the little gummy jump the farthest. You can experiment with different numbers of popsicles in the stack, and with the weight of the item that gets thrown.
You’ll need:
- Minimum of six jumbo popsicle sticks
- 5 rubber bands
- Bottle cap
- Tape or glue to attach the bottle cap
- Item to get thrown (we tried a gummy, a pompom, and a penny)
Attach a stack of four popsicle sticks with a rubber band on each side. Then attach two popsicle sticks with a rubber band. Place the stack of popsicles in the middle of the two popsicles and attach it with a rubber band from each side. Attach the bottle cover to the very end of one of the popsicle sticks and place an item there. Have fun lightly flicking the wide-open popsicle stick and watch how far it goes!
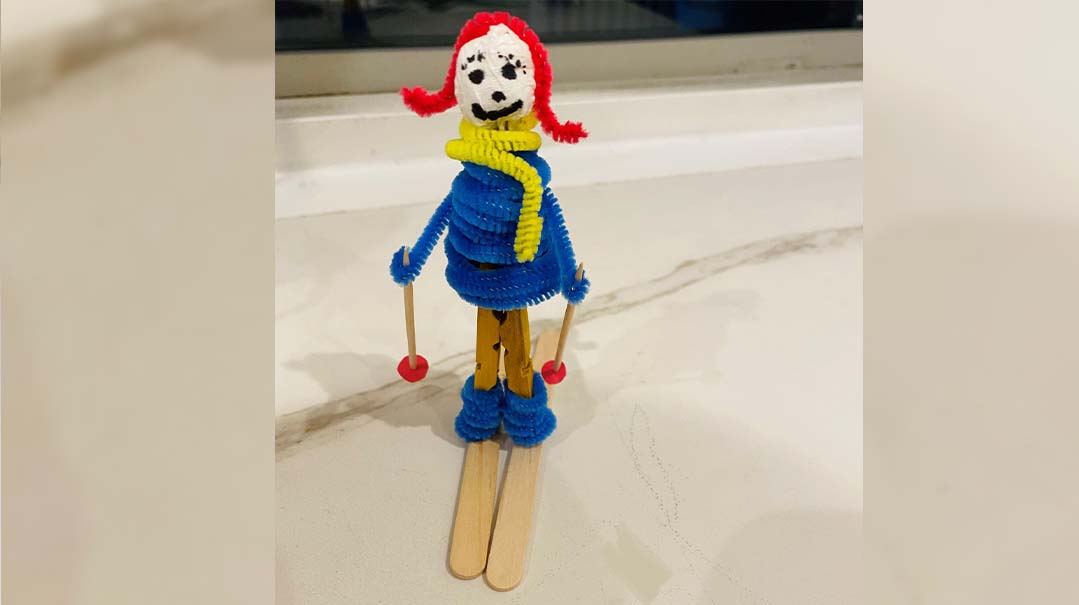

Standing Skiers
Nothing screams winter and snow like skiing does! These little people are charming and easily customizable.
You’ll need:
- 1 clothespin (I used a colored one)
- 3 toothpicks
- 2 small pieces colored paper
- 2 popsicle sticks
- Multiple colored pipe cleaners
- Tissue or napkin
- Glue gun
Start by removing the metal clasp from the clothespin. Using hot glue, glue the tips together. Then choose a colored pipe cleaner for the skier’s socks. Wrap a pipe cleaner around the bottom of each of the sides of the clothespin. Glue the clothespin onto the popsicle stick.
Create a bodice using another pipe cleaner. Wrap it around itself, and place it on the top of the clothespin. You can use a drop of glue here if you need to secure it. Then, using a napkin, make a tight ball for the head. Make a face of the ball, and stick a toothpick into it. Wedge the toothpick into the glue on the top of the clothespin. Add hair or a hat of your choice.
Then add arms. Simply rest the arms around the shirt, and make a little fold or loop for the hand on each end. Stick a toothpick in each hand with a tiny circle on the bottom to create ski poles. Finish off your little person with a scarf.

Bunker Down
This is a project for bigger kids, but the younger kids will enjoy the fruits of their labor, as they continue to use this adorable bunk bed for their smallest menschies!
You’ll need:
- Popsicle sticks, preferably in multiple colors
- Hot glue gun
- Scissors
Attach two sets of six popsicle sticks with hot glue. Then, once dry, attach another popsicle stick to the length of each of the flat surfaces you created. Attach four sticks to each of the four sides of one of the surfaces, and then attach the second surface. Add a guard rail to the top “bed,” and you’re done! Little dolls optional!
(Originally featured in Family First, Issue 776)
Oops! We could not locate your form.
RELATED CONTENT

Think beyond your fridge. Many doors, dishwashers, or other household items have a large magnetic surface


Here are some activities kids love — and their mothers do, too

Rainy days and loooong afternoons (and playdates) sometimes need a dash of fun

You can pull out an old game from the basement — but why not play one of these creative, curated games for even more fun?

Afternoons and Sundays can be long. Quarantine can be endless. Here are some relatively clean, safe, and inexpensive ideas to keep your little people busy for a while