Thinking out-of-the-box inspired these four costumes, all made with a cardboard box as their base
Photography by Dani Diamond
General notes
Each of these costumes use a box that fits the child wearing it. You can easily make a box smaller or a different shape by cutting and regluing the box to the right size.
A full-size glue gun will be significantly more efficient than a mini one.
Make sure the blade of your box cutter (utility knife) is very sharp for clean and easy cuts.
Duct tape looks very obvious once the box is spray painted. If using duct tape, try to do it from the inside of the box.
Takes the Cake
With just some simple steps, this strawberry short cake costume’s a piece of cake to make.
What you need:
Cardboard box
Box cutter/utility gun
Hot glue gun and glue sticks
Scissors
1-1.25” foam mattress topper or poly foam (long enough to wrap around the two longer sides of your box)
Quilt batting, approx. 2-3 yards, depending on the size of your box
1) Choose a cardboard box that is wider than your child by about 8–10” on the right and left, and significantly longer than them in length.
2) Using a box cutter/utility knife, cut off the four bottom flaps.
3) Cut one of the shorter panels off completely and discard.
4) Glue or duct tape the two open ends together to form the front point of your cake.
5) The top flaps should be cut into a triangle shape and glued down.
6) Cut a rectangular hole in the top flaps about 2” from the back of the slice of cake for your child to slip into. Reglue the top flaps down if necessary.
7) Using your box as a guide for size, cut your foam into a long rectangle that is the size of the longer sides of the box. (It should be one piece that will wrap around the front point of the cake.)
8) Glue the foam to the box.
9) Cut a strip of batting 6–10” longer (depending on the size of your box) than the length of both the longer sides of your box. Again, it should be one piece that will wrap around the front point of the cake.
10) Glue the strip of batting along the center of the foam as the cream between the two layers of cake.
11)Cut and glue the printouts of strawberries at various angles and intervals within the strip of batting.
12) Cover the top and back panels of the cake with batting. I found that one layer of the batting I was using was a bit thin, so I used a double layer of batting.
13) Cut six strips of batting that are 4” wider than the back of your box, and are about 10” high.
14) Twist two strips of batting together, and glue them along the top, middle, and bottom of the back of your box. Add faux strawberries along the top and bottom twists.
15) Add another two strawberries on top toward the front point of your cake.
16) Add ribbon or strips of batting as straps to hold the slice of cake on your child’s shoulders, gluing them from the inside of the rectangular hole in the top of the cake. (Crossing the ribbon or batting in an x-shape will keep the straps from slipping off your child’s shoulders.)
17) For the strawberry hat, cut and glue green felt leaves and a stem to the red beanie and draw seeds using yellow puff paint.
A Fry-day Purim
Which kid doesn’t like French fries?
You will need:
Cardboard box
Box cutter/utility knife
Hot glue gun and glue sticks
Red spray paint
Yellow pool noodles
White lettering (can be printed and cut out, or bought as ready- to-go stickers)
Yellow ribbon
Yellow T-shirt
1) Choose a cardboard box wider than your child by about 6–10” on all sides.
2) Using a box cutter/utility knife, cut off the four bottom flaps of the box.
3) Cut the three front upper flaps off as well, leaving only the back one.
4) Cut the front panel of the box off.
5) Bend the bottom two sides of the cut off panel to form triangular creases.
6) Fold the front bottom corners of the right and left panels inward to form another triangular crease.
7) Glue the folded sides of the front panel to the right and left sides of the box.
8) Cut an indented, shallow semi-circle across the top width of the front panel.
9) Cut the back top flap into a semi-circle.
10) Spray paint the box red.
11) Adhere your white lettering to the front of the box to form the words “French fries.”
12) Cut yellow pool noodles to size and hot glue them at different heights across the back of the box.
13) Add some more noodles once you try on the costume and see where they can comfortably fit.
14) Hot glue two lengths of yellow ribbon to the inside of the front of the box where your child’s shoulders will be.
15) While your child is trying on the costume, cross the ribbon behind their shoulders and mark where to glue the ribbon at the back. (Crossing the ribbon in an x-shape will keep the straps from slipping off your child’s shoulders.)
16) Remove the costume and glue the ribbon where marked to the inside of the back of the box.
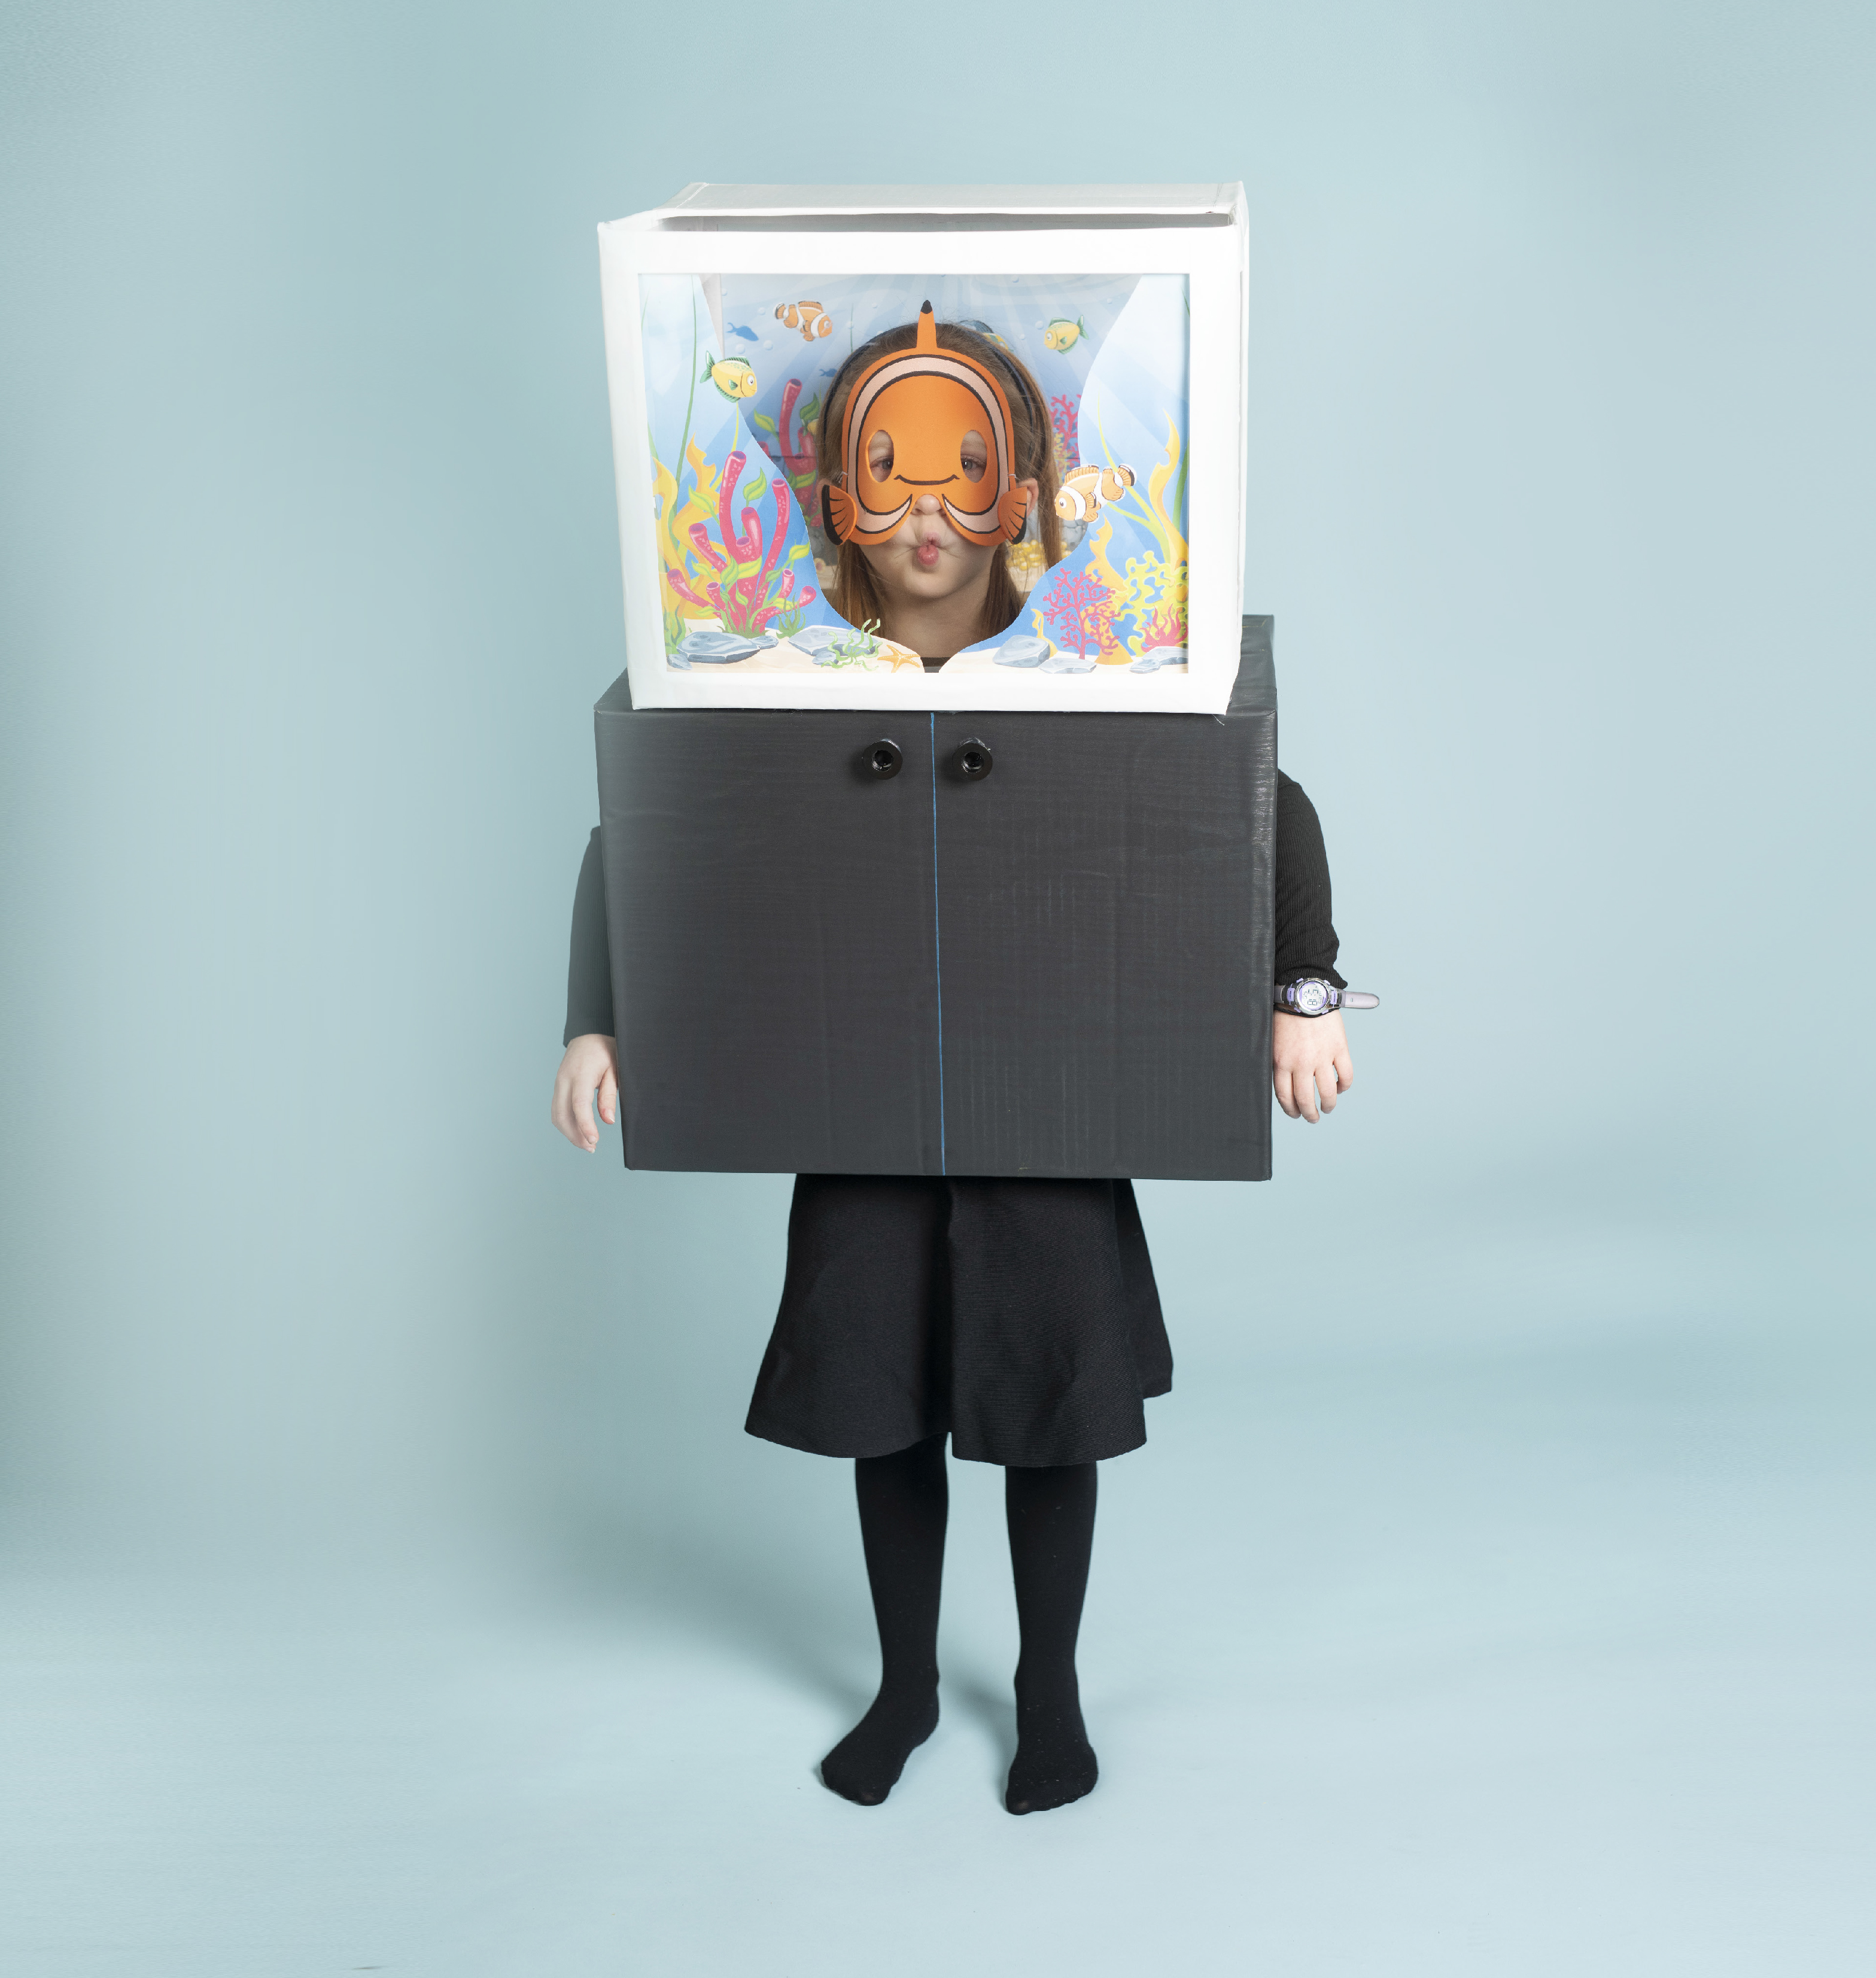
Gone Fishing
Your child will be hooked with this “fintastic” fish tank costume.
What you need:
2 cardboard boxes
Box cutter/utility knife
Hot glue gun and glue sticks
Scissors
White spray paint
White duct tape (optional)
Clear stencils sheets (or clear cellophane)
Sand paper
Fish tank printout formatted to fit the size of your box
Paint marker (or any marker that will show up on the color of the cabinet)
2 cabinet knobs or black soda bottle caps
Fish mask
1) Choose a cardboard box larger than your child’s head by about 6” in the depth and about 8–12” in the width.
2) Seal the bottom four flaps closed, and using a box cutter/utility knife, cut a circle in the center that’s slightly larger than your child’s head.
3) Cut the upper front flap off and discard. Seal the upper back flap to the back half of the two side flaps. Then cut off the front half of the side flaps, leaving the front half of the top open so your child can breathe.
4) On the front and two sides of the box, measure a rectangle that is two inches from each side. Cut out the rectangle and discard.
5) Spray paint your box white on all sides.
6) Line the bottom of the box with sandpaper.
7) Print, trim, and paste the aquarium background paper to the back of your box.
8) Cut the clear stencil sheets to size and paste them from the inside of the box to cover the openings on the three sides.
9) Cut and paste the two front aquarium printouts to the inside of the front of the box, against the stencil sheet. Make sure that there is enough room between the two papers for your child’s face to be seen clearly. If not, print the two sides out formatted to be slightly smaller.
10) You can wrap white duct tape around the edges for a more finished look.
11) The second cardboard box should be very slightly wider than your child’s shoulders.
12) Using a box cutter, cut off the bottom four flaps and discard.
13) Seal the top four flaps closed.
14) Cover the box in wood-style contact paper.
15) Cut a circle in the center of the top of the box that’s slightly larger than your child’s head.
16) Have your child try on the box and mark the approximate spots from their shoulder to armpit. After taking off the box, cut a hole on both sides for your child’s arms.
17) Using the paint marker, draw a line down the front center of the box and attach two cabinet knobs using hot glue.
18) Glue the two boxes together, lining up the two head holes.
19) Put a fish mask on your child and let them dive right in!
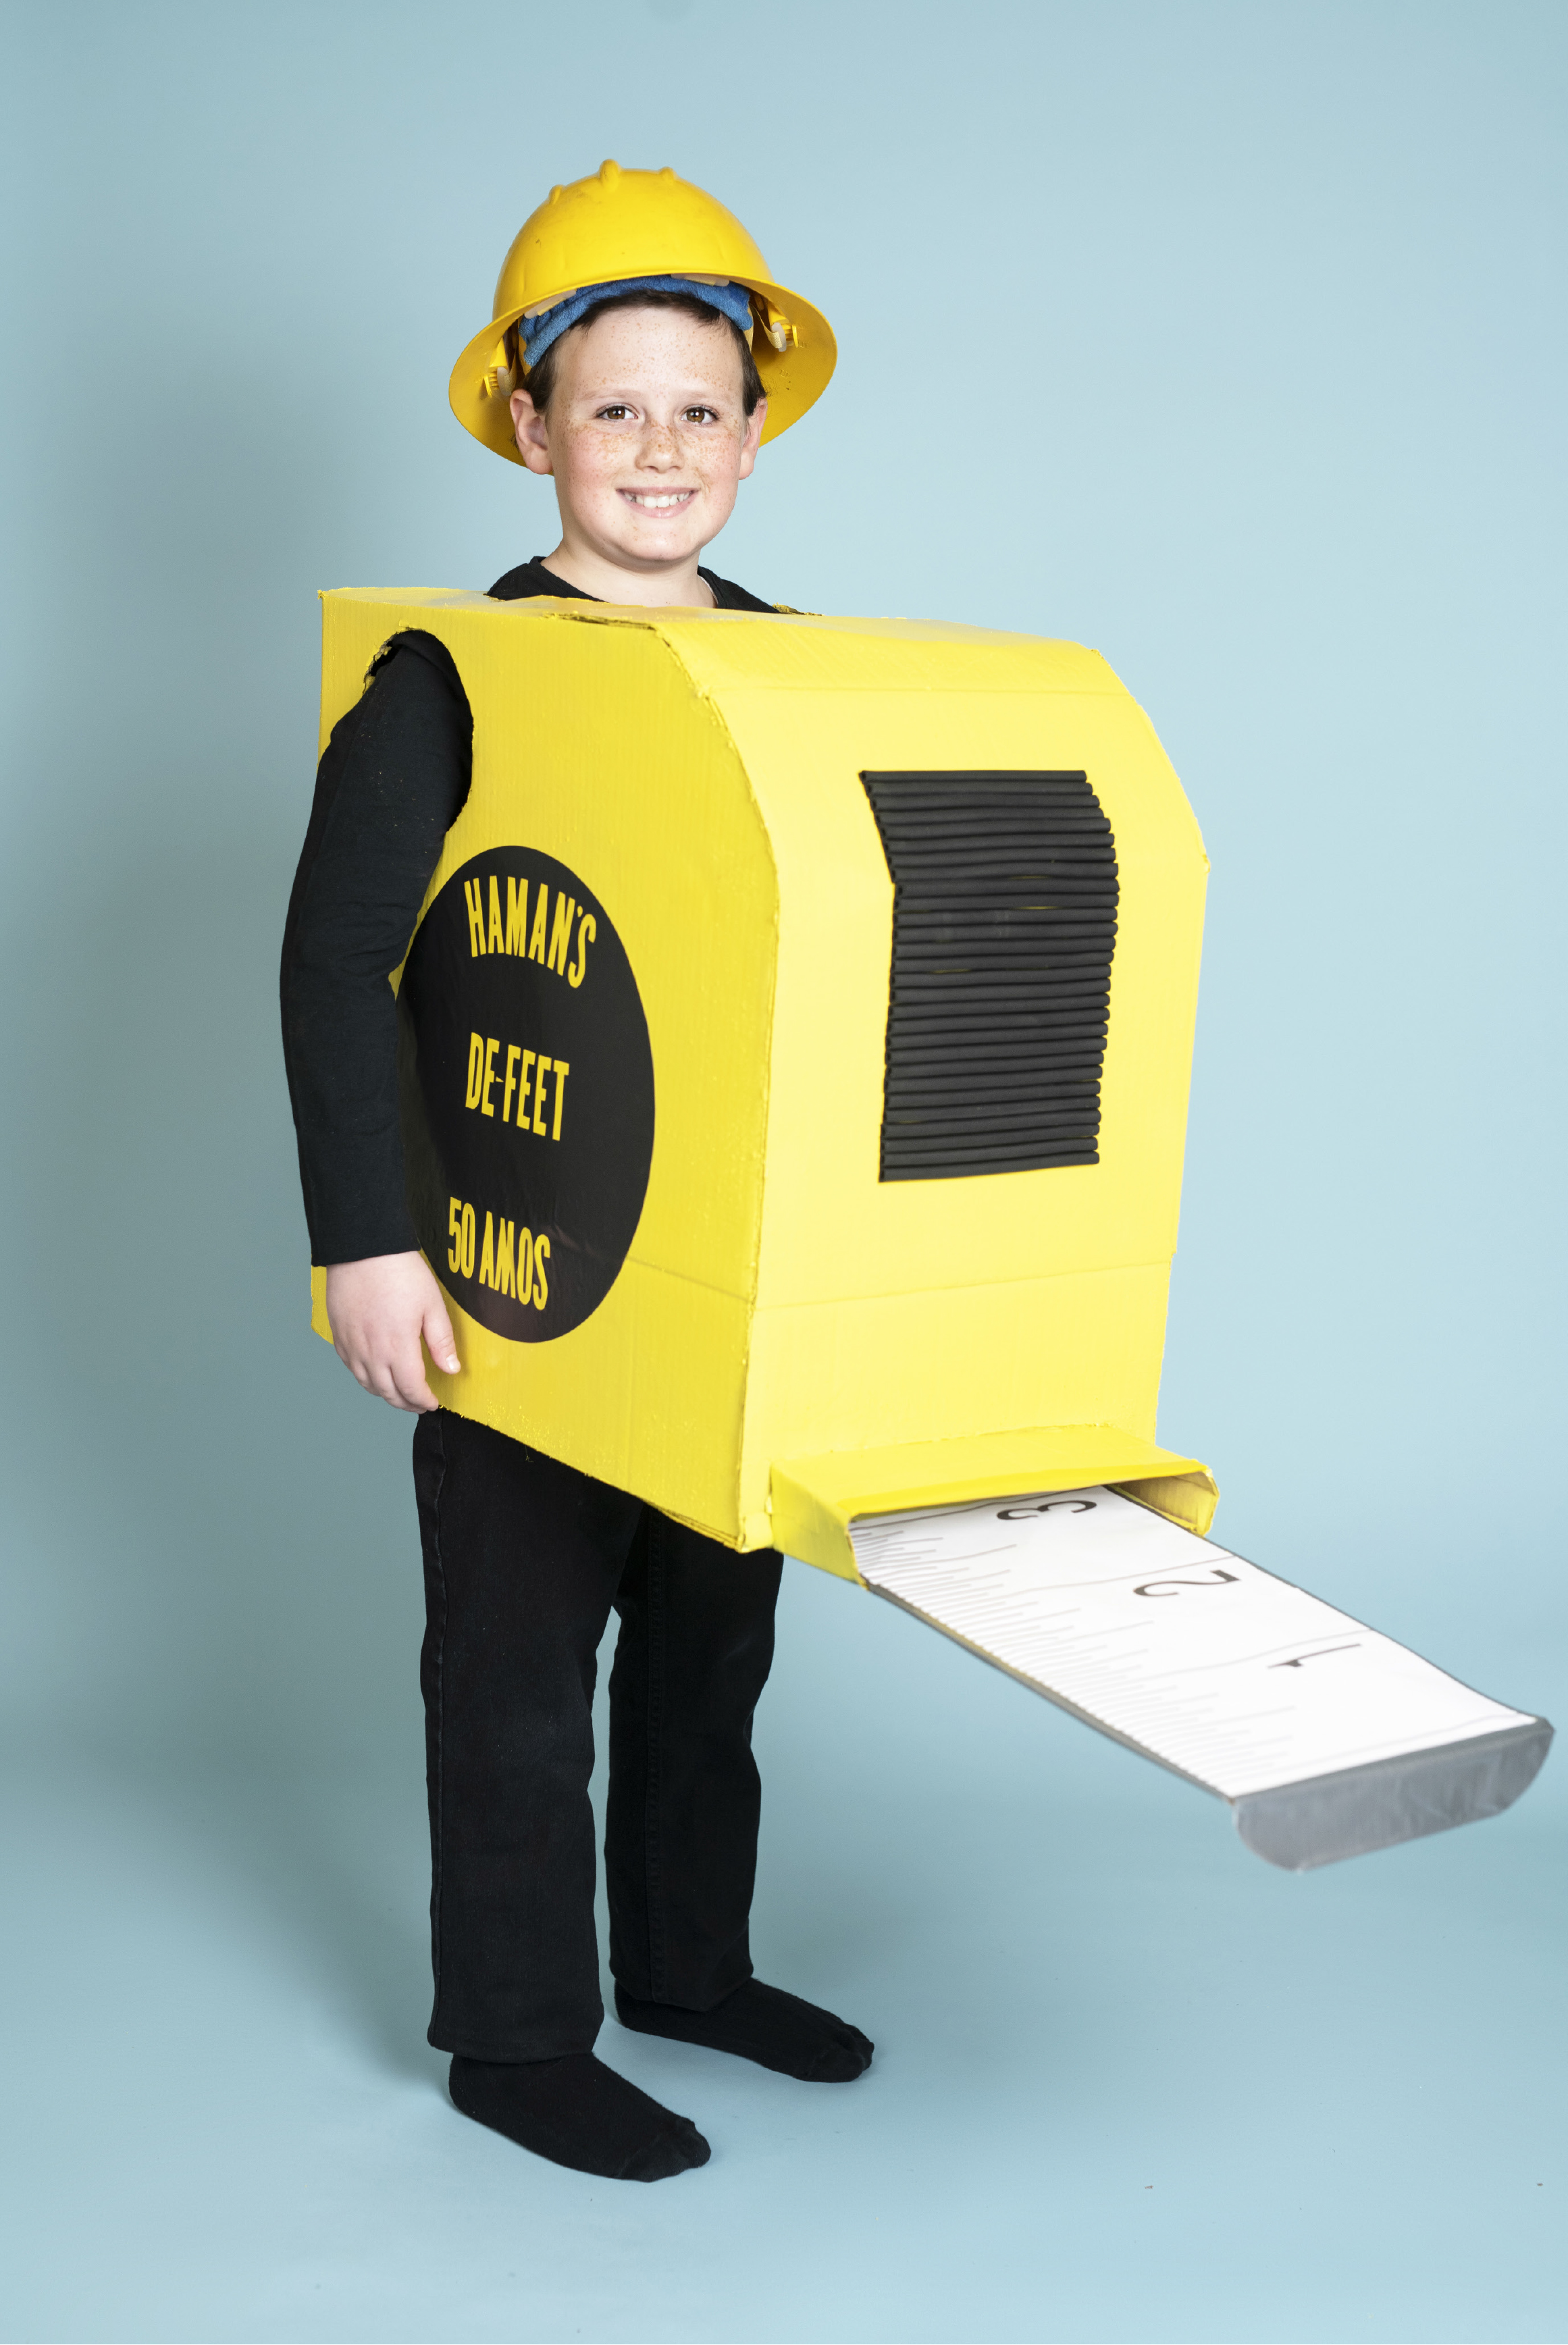
Made to Measure
This tape measure costume certainly measures up!
What you need:
Cardboard box
Cereal box, cut in half down the center, lengthwise
Box cutter/utility knife
Hot glue gun and glue sticks
Scissors
Yellow spray paint
Black oak tag, contact paper, or vinyl.
Yellow lettering (can be printed and cut out, or bought as ready-to-go stickers)
Black foam window weather strip (approx. 8–10 feet, depending on the size of your box)
1) Choose a cardboard box that is wider than your child by about 2– 4” on the right and left, and 1–2′ longer than them in the length.
2) Depending on the height of the box, you might need to keep the bottom flaps open, attaching them at the corners. Otherwise, using a box cutter/utility knife, cut the bottom back flap off and discard. Stick the bottom front flap to the two side flaps and then cut off the back half of the side flaps, leaving the back half of the bottom open for your child to stand in.
3) Cut a slit about 12” long along the creases of both the left and right of the front of the box.
4) Seal the back flap closed to the side flaps. Leave the front flap alone for now.
5) Cut a circle in the back of the top that’s slightly larger than your child’s head.
6) Have your child try on the box and mark the approximate spots from their shoulder to armpit. After taking off the box, cut a hole on both sides for your child’s arms.
7) Mark and cut a curve on the upper front of the two sides of the box, about 12” from the upper front corners.
8) Bend the top on the front of the box to meet the curve. Seal the front flap along the curve and at the top of the box.
9) Glue your half cereal box, centered at the bottom of the front.
10) Spray paint the entire box yellow.
11) Cut the foam window weather strip into even pieces, approximately 5-10” depending on the size of your box. Peel and stick them horizontally in a stack along the front of the box.
12) Take your black paper or vinyl and cut a circle about 1.5–2” in diameter and using your yellow lettering, write any company name you choose along with a dimension.
13) Print out the ruler and glue it to the scrap cardboard. Glue it onto the cereal box.
14) Wrap wide duct tape around the end of the ruler. Cut a curve at the end and bend it downward.
Whether you’re a DIY-er or not, the key points to recognize are that creating a little oasis of play space doesn’t require excessive square footage or a wild imagination.