Making the Cut
| September 2, 2020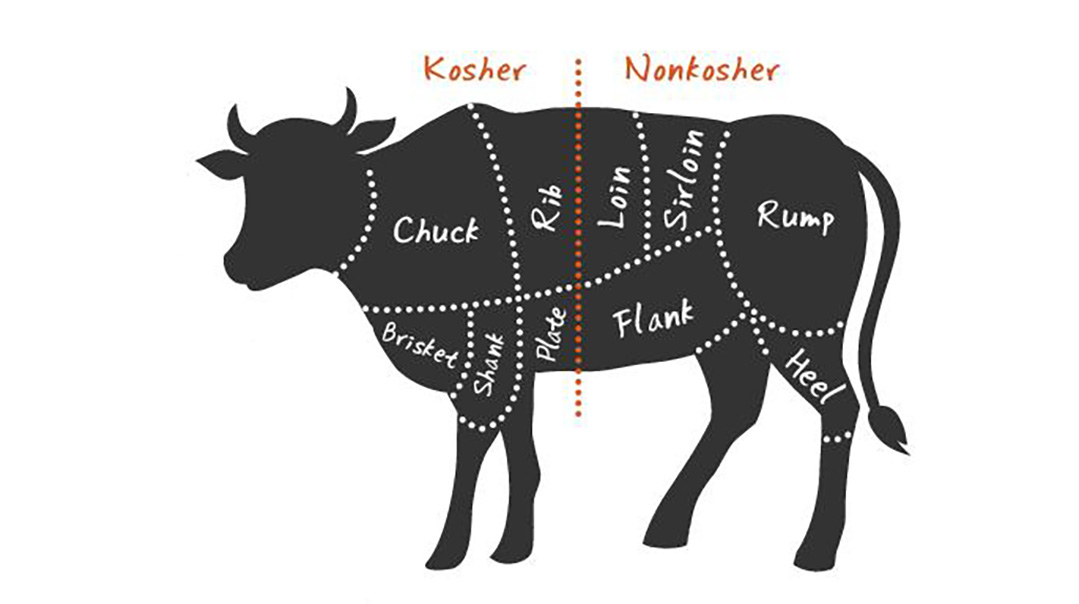
For many home cooks, cooking meat is one of the most terror-inducing tasks they’re given. Often, all you need to say is “cook meat,” and people get triggered. I admit that before I took the time to learn, understand, and master meat, I felt equally overwhelmed! I can totally relate to being served tough, flavorless cuts of meat that have been cooked incorrectly. But as a chef, I’ll tell you that even tough cuts of meat can turn into hearty, buttery, fall-off-the-bone, all-flavor-intact-dishes when the proper cooking techniques are implemented. Let’s learn how.
Tough versus Tender
Tough cuts of meat come from sections of a cow’s hardworking muscles. The cow’s shoulder blades, neck, upper arm, breast, and leg muscles, just like a human’s, are all hard at work throughout the day. Chuck, brisket, shank, and plate primal cuts come from these tough sections. The largest of these cuts is the chuck primal, which means that the majority of the meat you pick up at your local butcher or supermarket come from here. In addition, one third of a cow — the loin, sirloin, tenderloin, round, and flank primals — isn’t kosher, which narrows down your buying options. Tender cuts of meat come from a cow’s midsection. These muscles are weaker and are either relatively low-activity muscles or suspension muscles (which support other muscles) and aren’t used much, yielding the most tender, juicy, and flavorful cuts of meat. Common cuts of meat from the rib section are the rib-eye steak, standing rib roast, prime rib, flanken, Miami ribs, short ribs, and spare ribs. Other cuts from the midsection aren’t available to the kosher consumer, since the sciatic nerve runs through them.
Tender cuts of meat aren’t ranked for their tenderness by the amount of fat they contain, but rather by how marbleized the fat is within the meat, or how evenly distributed. If a cut of meat has a subcutaneous fat cap (a big hunk of fat in one place) and no marbled fat within the meat fibers, the fat can all melt at once in the oven, leaving you with a tough and chewy piece of meat. On the other hand, a cut of meat that has plenty of fat marbleized throughout the meat fibers gives every bite some fat, flavor, and a buttery mouthfeel.
Cooking Methods
Tender cuts of meat benefit most from quick-dry heat cooking methods (such as grilling, broiling, roasting, etc.), since they have lots of natural fat and juices. Tough cuts of meat generally require slow-and-low cooking (braising) to break down the tough connective tissues. During a long braise, the collagen of a tough piece of meat gradually breaks down, turning it into a succulent, flavorful dish.
While tough cuts of meat typically require moist heat methods, sometimes undercooking works as well, compensating for lack of fat and natural juices by preserving the minimal fat and natural juices already there. However, undercooking doesn’t work on all tough cuts of meat, especially with cuts that contain large amounts of silver skin, or connective tissue. You should only undercook a tougher cut of meat if it has little to no fat and not too much connective tissue. French roast, London broil, chuck-eye roast, club steak, oyster steak, pepper steak, skirt steak, Delmonico steak, Swiss steak, and stew meat are all examples of tougher cuts that fall into this category. (See sidebar on how to undercook meat.)
While minute roast has considerable silver skin blanketing the top of the roast and a thick gristle running right down its center, it can still work if you cut away the majority of the silver skin before cooking and cut away the meat around the gristle once it’s cooked. Brisket, kolichal, top-of-the-rib roast, and chuck shoulder roast have too much connective tissue marbled throughout the meat fibers to work with undercooking.
The Four Steps to Proper Braising
Braising makes heroes out of home cooks. There is no other technique that asks for so little yet gives back so much. As long as you can remember four simple, universal steps, you can master it!
As much as braising is about low, slow cooking, it’s also about building flavors. It often starts by searing meat and sautéing the vegetables before adding the liquid to the pot. Both of these steps add rich, caramelized flavors to the final dish. Many braised dishes are also generously seasoned with herbs and spices. For yet another layer of flavor, broth, barbecue sauce, wine, beer, or alcohol can be added along with the braising liquid.
Step 1: Sear Your Meat Pat your meat dry with paper towels. (This reduces extra moisture so the seasoning sticks to the meat and doesn’t slide off into the pan.) Season the meat on all sides with salt and pepper, using your fingers to press the seasoning in.
Set a Dutch oven, a large cast-iron pan, or a good-quality large sauté pan over medium-high heat until clear smoke is visible, about three minutes. Add in three to four tablespoons of neutral oil (light olive, canola, or safflower) with a good smoke point and allow the oil to get hot (the oil should move around like water), about 30 seconds.
Add the meat and sear. Don’t crowd the pot, and take the time to get deep color on all sides, about 5 minutes of uninterrupted searing per side. To sear on the short sides, hold the meat using tongs until it sits steady. Remove meat from pan; set aside.
Step 2: Sauté Your Vegetables Sauté chopped, diced, or sliced onion, or any other vegetables your recipe may call for in the same pan, using the drippings left behind from searing, stirring frequently. (If your recipe doesn’t call for vegetables, skip this step.) Like the sear, use medium-high heat and aim for a caramely brown color without scorching or burning your vegetables.
Step 3: Deglazing the Pot Add the braising liquid — chicken or beef broth, white or red wine, water, or a marinade such as barbecue sauce, stirring and scraping up any browned bits from the bottom of the pan with a wooden spoon or rubber spatula. You want to make sure these flavorful bits don’t get left behind because when they dissolve in the cooking liquid, they take your dish to the next level.
Step 4: Braise It Return the meat to the pan with any accumulated juices it gave off while resting. The meat shouldn’t be submerged in liquid; rather, it should be covered a third to half the way in liquid — you’re braising, not boiling! Bring the liquid to a simmer, then cover and place the pot/pan into a medium-low oven (oven temperature should be anywhere from 275–325°F/135–160°C) until the meat is fork-tender.
Don’t overcook your meat, since that will make it dry and chewy. Many of us cook our meat like cholent, as if that’s the road map for cooking guidelines. While cooking cholent overnight for long hours creates a hearty dish, cooking most food for that long isn’t going to work.
Allowing Your Meat to Rest
Allowing meat to rest before carving it may seem like an unnecessary step, but there is a solid theory behind it. Meat continues to cook even after it’s removed from the oven and needs time to finish doing its thing. (That’s why most recipes will tell you to take your meat out a few degrees before desired doneness.) In addition, as meat cooks, the muscle fibers start to firm up, pushing the juices outward towards the surface of the meat. Letting the meat sit allows it to
A quick reference guide to kosher and non-kosher cuts of meat relax and the juices to redistribute. If you cut into the meat when it’s just out of the oven, the liquid will pool out, drying out your beautiful piece of meat.
Once you remove your meat from the oven, tent it with a sheet of foil (not mandatory, but this will keep it warm once its internal temperature peaks). How long the meat needs to rest depends on its size. A steak may only need three to five minutes to rest, whereas a roast can need anywhere from ten to twenty minutes. Your recipe will be your best reference. (Allowing meat to rest applies to all cuts of meat, tough or tender.)
Final Tip: Slicing You’ve probably heard many times that meat should always be sliced “against the grain.” If you’re wondering what that means and why it’s so important, let me tell you. Grains of meat (not to be confused with barley or rice grains, for example) refers to the direction that the muscle fibers are aligned. In some cuts of meat, it’s easier to identify which direction the grains are aligned — for example, skirt steak, hanger steak, brisket, pastrami, and corn beef. By cutting against the grain, you’re cutting through the long and tough fibers to make your meat less chewy.
Is your mind blown, or the least bit more informed?! My hope is that your confidence for cooking meat has gone up substantially. Now hurry along and get a head start on your Yom Tov meat prep!
How to Undercook Meat
When undercooking tougher cuts of meat, you should take your meat out of the oven when it registers no less than 135°F (57°C) and no more than 145°F (62°C) on a meat thermometer. Undercooking the meat more than this will leave you with a raw rough chew, and overcooking the meat will leave you with an overcooked rough chew. Temperatures of 135–145°F are the sweet spot for juicy, undercooked meat. The meat should be a nice color.
(Originally featured in Family Table, Issue 708)
Oops! We could not locate your form.


