Superfoods
| February 15, 2022Here are some delicious, fun-to-wear and easy-to-create "edible" costumes
Photography: Chaya Miller
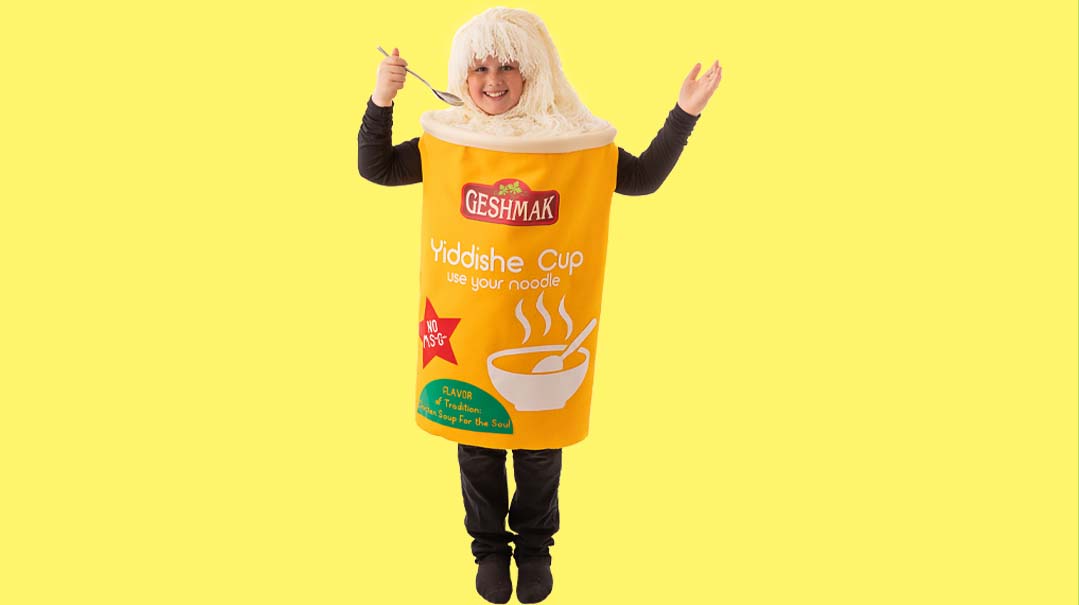

Souped Up
This costume was inspired by my kids’ tendency to beg for Gefen Noodle Soups every Sunday at half past noon. It’s the classic kids’ comfort food, almost a tradition, stemming from my camp days.
You’ll Need:
- yellow felt
- off-white felt
- white U-shaped foam edge protector
- Velcro
- dark fabric iron-on printing paper
- light fabric iron-on printing paper or iron-on vinyl
- wide satin headband
- size 6 (chunky) white yarn
- scissors
- hot glue gun
- hot glue sticks
- icon templates (available below)
Icon Templates:

1. Measure a piece of felt to fit your child’s body, from their neck to their knees. It should comfortably fit around their body in width and should get slightly narrower toward the bottom. Add an extra inch to the width to allow for a Velcro closure to overlap.
2. Secure Velcro along the length in the back.
3. Measure a strip of the U-shaped foam to be the same width as the felt. Hot glue the top of the felt to the inside of the U. It will form the round top of your soup cup.
4. Cut a circle of white felt about 2 to 3 inches wider than the foam circle. Cut a slit in the felt, halfway through the circle, until the center. Cut a hole in the center of the circle large enough for your child’s neck.
5. Line up the slit in the white felt with the back of the costume. Hot glue the white felt to the yellow felt all around, right below the foam.
6. Try the base on your child and mark the spot and size for arm holes. Remove the costume and cut accordingly.
7. Print the downloaded templates and iron them onto the costume. You can also hand cut or use a Cricut or other cutting machine on the iron-on vinyl.
8. Place the satin headband comfortably on your child’s head. Using some yarn, measure the length from the front part of the headband until their eyebrows. Cut lengths of white yarn for bangs. Hot glue one end of each yarn length to the front of the headband. You can do a few together. Be generous; they should form thick bangs.
9. Put the headband back on your child. Using a piece of yarn, measure the length from the back half of the headband until past their shoulders. Again, cut lots of yarn to that length, and hot glue it all to the headband densely.
10. Unravel each piece of yarn by twisting it from the top in the opposite way it’s spun. Help it along with your fingers. This part is quite time consuming, but is pretty mindless as well, so you can do it while on the phone or even have your kids do it.
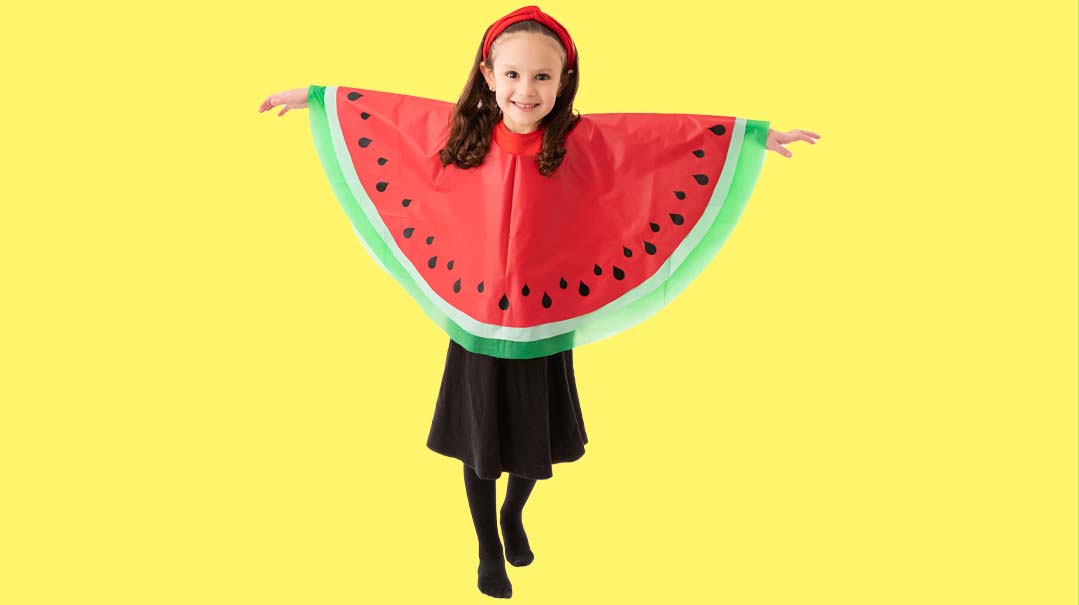

One in a Melon
Sweet, cold, and juicy watermelon is the most refreshing snack. This costume is so easy to make, you’ll be ready to enjoy it long before the temperatures rise and summer comes along.
You’ll need:
- red tablecloth
- dark green tablecloth
- light green tablecloth (optional)
- black adhesive vinyl or a black permanent marker
- double-sided tape
- yardstick or measuring tape
- scissors
1. Measure your child with their arms spread out from wrist to wrist. Divide that number by four. (For example, if from wrist to wrist they are 36”, you’ll be using the number 9.)
2. Fold your dark green tablecloth in half lengthwise and widthwise. I used a round tablecloth, but you can use any shape.
3. Using the fully folded corner as your base point, measure your magic number all the way around so you end up with a quarter of a circle. Cut out all four layers of the quarter circle.
4. Repeat with your light green tablecloth, but subtract 2” from that lucky number. (As for our example, measure 7” to create your quarter of a circle.) If you’re skipping the light green, then use the red for this step and skip step number five.
5. Repeat once more with your red tablecloth, but this time subtract 1” (in our example, it would be 6”).
6. Unfold your tablecloths and layer them with the dark green on the bottom, the light green next, and the red on top. Fold them in half once, leaving you with a semicircle.
7. Using double-sided tape, secure each layer in place.
8. Cut a small semicircle opening in the center of the straight part so your child’s head can fit through. Slipping your scissors in, cut the greens into a slightly wider circle so they’re not visible around the neckline. Secure with double-sided tape as needed.
9. Cut “seeds” from black adhesive vinyl, or draw them on with a black permanent marker. Bigger seeds go closer to the rind and smaller seeds are further in.

It’s a Fortune
I’ve never met anyone who didn’t enjoy a fortune cookie. Even if they didn’t like eating it, they definitely enjoyed cracking it in half to reveal that slip of paper with a few ambiguous words and Chinese symbols. Though this cookie cannot be cracked, the fortune can be pulled out and is automatically retracted so everyone you meet can still get the thrill of seeing their fortune!
You’ll need:
- gold felt
- small measuring tape
- stuffing
- cardboard
- strong tape
- printed fortune (available here)
- white cardstock
- scissors
- 4 large beads
- fishing string
- hot glue gun
- hot glue sticks

1. Fold your felt in half. You’ll be cutting a semicircle; the fold will form the straight side of the semicircle. To figure out what size to cut your felt, measure your child’s torso on a diagonal, from his shoulder to his opposite hip. For the length, double that and add an extra foot. (Say your child’s torso was 18” across, the length across the straight fold should be 48”.) For the radius of the semicircle, just double the torso measurement. (In our example, this will be at the 36” mark.) Draw and cut out the semicircle. Unfold the felt. It will be torpedo shaped.
2. Cut a scrap piece of cardboard into a nose cone shape. It should be approximately 6” to 8” wide, slightly shorter than your child’s torso. Glue the cardboard nose cone to your felt on one side of the length of the felt and in the middle widthwise. The wider end of the nose cone should face the center of the torpedo-shaped felt. (Refer to the photo above)
3. To create the retractable fortune, pull your tape measure out to about 13” and lock into place. Wrap a piece of heavy tape around the 12” mark several times so it stops the measuring tape from retracting all the way. Unlock the measuring tape.
4. Print the downloadable fortune or create your own on the top half of a paper, in landscape orientation. Fold the paper in half lengthwise. Cut a piece of cardstock and half lengthwise as well. Glue the printed half of the paper to the cardstock. Slip the extended measuring tape into the center between the folded paper. Glue the cardstock, measuring tape and back half of the paper together.
5. Tape your measuring tape onto the wide end of your cardboard well. The right side of your fortune should be lined up with the end of the felt.
6. Pull the rounded sides of the felt up and start gluing them together with hot glue about 1” from the edges all around. Leave an opening on either side so you can stuff it.
7. Fold your fortune cookie in half, bringing your cardboard side back-to-back with the opposite side of the cookie. Hot glue the crease at the fold.
8. Knot a bead to the end of a length of fishing string. Repeat, because you need two. You’ll need to push the open end of the string through the felt from the inside of the fortune cookie in two spots.
9. At this point, try the costume on your child with the cardboard side in the front and the fold on their shoulder. To hold the costume in place, the fishing string will need to go across their hip from the back to the front, and also across their empty shoulder. Push the fishing string through the felt from inside the cookie, in the back. Then bring it over and push it through in the front, securing it with a knotted bead on the inside again.
10. Stuff each half of the cookie loosely and seal the ends with hot glue. In the front, seal the end until you reach the fortune.

Cute as a Button
Button up for the yummiest showman in town.
You’ll need:
- white pants
- white shirt
- white top hat
- wide white ribbon
- white cardstock
- colored sponge balls, two in each color
- large button candy pieces
- glue dots
- scissors
- white baton (optional)
1. Cut your sponge balls in half. I found using a kitchen paring knife was the simplest way to get a neat cut. Using glue dots, secure your balls in place on your pants.
2. Cut two strips of two rows of button candy and secure the pieces around the base of the top hat.
3. Using the wide ribbon, measure and cut suspenders and glue or safety-pin into place. Cut strips of three rows of button candy and use glue dots to attach them to the ribbon. I’d suggest doing this part once your child is dressed for the day.
4. Cut a bow shape out of cardstock and attach strips of button candy to it. Attach it to their shirt using glue dots, a clip, or a pin.
Tips:
Keep an extra package of button candy and glue dots on you when you go out so you can glue new buttons into place if any fall off. Button candies come off the paper fairly easily, so you can either ignore it or fix it.
If the top hat is too big for your child, you can glue dot foam or anything similar into the top so it sits a bit higher.
(Originally featured in Family First, Issue 781)
Oops! We could not locate your form.
RELATED CONTENT

Four women use junk to create a magical experience for a frum audience

A collection of very strong opinions about very small things

When a husband travels regularly for work, what’s it like for the family?


What sleep deprivation does to your body and brain, and what you can do to get the rest you need

What it’s like living with an invisible allergy no one believes exists