Cupcake Cake’s Take the Cake

Styling By Esther Eisenberger Of Cupcakes By Esther Photography By Baila Rochel Leiner
Takes the Cake
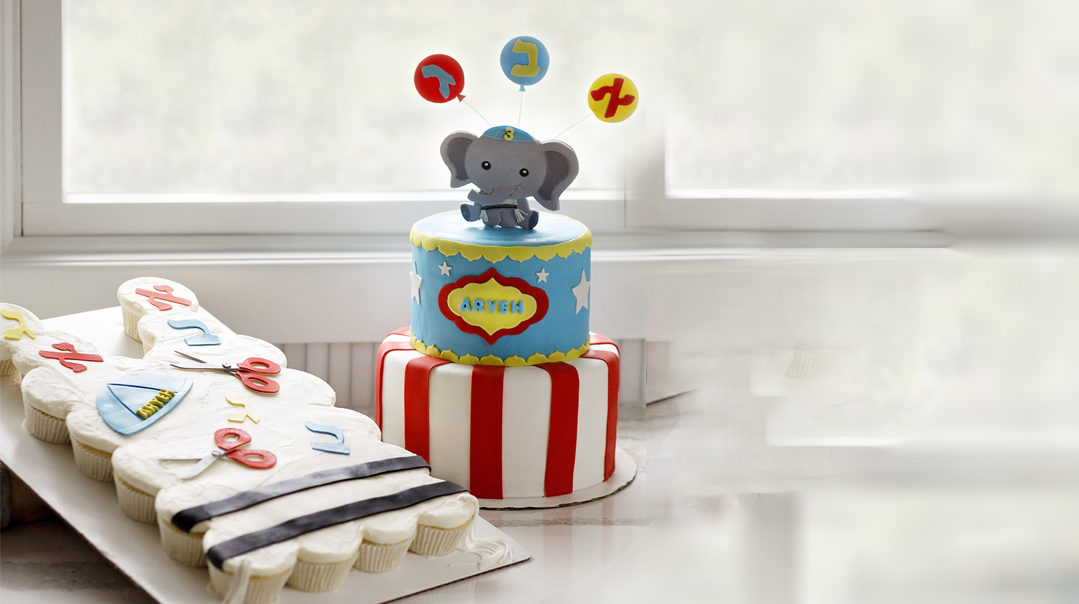
I’d like to introduce you all to my uber-talented friend, Esther Eisenberger, better known in the industry as “Cupcakes by Esther.” Esther started out years ago by making parshah cupcakes for her family. As her cupcakes became more elaborate, she gained a fastgrowing weekly e-mail following, with people waiting each week to see her creations and share them with their friends and family. Then she started getting requests to make cupcakes for other people too, and that’s how Cupcakes by Esther was born. Eventually she started making cakes also, and that brings us here today! Esther made two very different cakes for this upsheren issue. One is a cupcake cake that’s great for kids and parties and fairly easy to make. The other is a more elaborate cake for those of you who are up for a challenge. Feel free to adjust as you see fit. The most important part is that it should be fun and stress free.
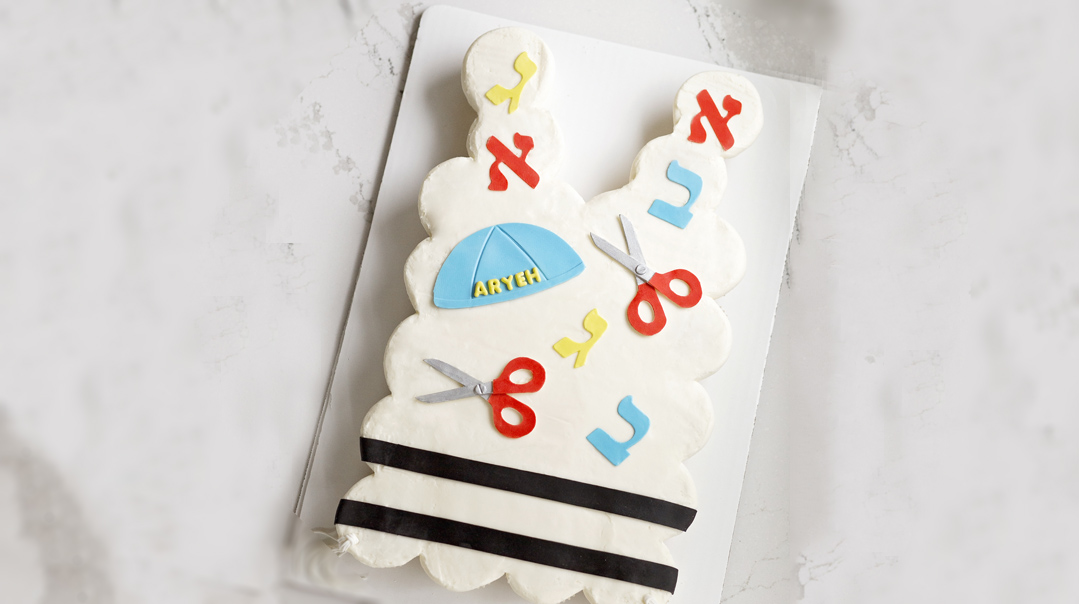
Tzitzis Cupcake Cake
Tip: To decorate her cakes, Esther likes to use gum paste rather than fondant. It can be rolled out thinner than fondant, dries more quickly, and keeps its shape better.
Cupcake cakes are easy to serve and fun for parties. Just pull one cupcake off and enjoy! They’re usually rectangular shaped, with cookies or fondant decorations on top. Esther E. decided to make this one a little more fun by shaping it like a pair of tzitzis.
YOU WILL NEED:
- cupcakes of your choice
- gum paste or fondant in desired colors
- nonstick baking mat
- cornstarch or confectioners’ sugar
- printed decorations such as yarmulkes,
- scissors, and alef-beis
- Exacto knife
- large rectangular cake board
- white frosting of your choice (cream
- cheese and buttercream both work well)
- piping bag with a large round tip (like Ateco #809)
- bench scraper or offset spatula
- fondant extruder (similar to a Play Dough tool)
1. Roll out gum paste or fondant on a nonstick mat dusted with cornstarch or confectioners’ sugar. Let it stiffen for a few minutes.
2. Place your printed decorations over the gum paste and carefully cut the shapes out of the gum paste with a sharp Exacto knife.
3. On the cake board, arrange your cupcakes in the shape of a pair of tzitzis. Put a small amount of frosting under each cupcake so it stays in place on the board, then gently push the cupcakes closer together. Pipe some frosting in
the gaps between the cupcakes.
4. Pipe frosting along the edge of the whole cupcake cake, following the bumps of the cupcakes.
5. Pipe frosting over the tops of all the cupcakes in the middle of the cake. This doesn’t have to be done neatly. Using your bench scraper or an offset spatula, smooth out the frosting as best as you can.
6. Now it’s time to decorate! Using black gum paste or fondant, cut out two strips each, about an inch thick, for the tzitzis, and arrange them carefully near the lower edge of the cake.
7. Use a fondant extruder, if you have one, for the tzitzis strings. Put some fondant or gum paste in the extruder, using a cover with a bunch of holes. Squeeze out the fondant and you have tzitzis strings! You can also roll the strings by hand and bunch them together, or cut very thin strips with the Exacto knife. Attach the strings to the bottom edges of the cake. 8. Now add all of your decorations to the top of the cake and take few steps back to enjoy the effect.
9. Enjoy your final product!
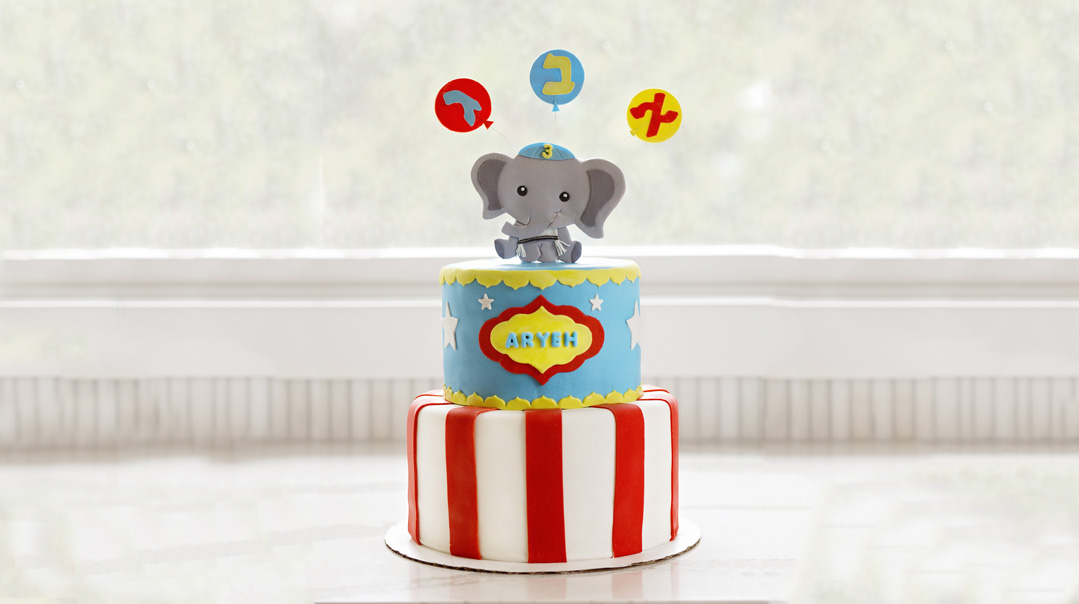
Circus Cake
To go along with the beautiful and bright circus theme, Esther E. created the two-tiered cake pictured here. You can easily do just one tier instead. Again, have fun and be proud of your final product.
YOU WILL NEED:
- gum paste in various colors
- food coloring, if desired
- nonstick baking mat
- cornstarch
- circus animal printout of your choice
- Exacto knife
- wires and/or lollipop sticks
- 1½-inch circle cookie cutter
- alef-beis cookie cutters
- 3 6-inch round cakes (for the top tier)
- 3 8-inch round cakes (for the bottom tier)
- white buttercream frosting
- 10-inch round cake board
- 6-inch round cake board
- turntable, if you have one
- piping bag with a round tip (like Ateco 807)
- offset spatula and bench scraper
- red, white, blue, and yellow fondant or frosting
- 4 straws
- plaque-shaped cookie cutters (in 2 sizes)
- star-shaped cookie cutters
- letter molds or food markers
FOR THE ELEPHANT
1. Mix some black and white gum paste or use a tiny drop of black food coloring in white gum paste to make gray. (Make sure to wear gloves if you’re using food coloring.) Roll out the gum paste on a nonstick baking mat
dusted with cornstarch and let it sit a bit to harden a little.
2. Place your elephant printout on top of the gray gum paste and carefully cut it out with an Exacto knife. You can add as many details as you like. This one has a yarmulke and tzitzis! To stick on the details, use a tiny bit of water or water mixed with a little bit of gum paste (we call it gum glue). Push two wires or a lollipop stick into the bottom.
3. Let your elephant dry completely. This may take a day or two.
FOR THE BALLOONS
1. Cut out three gum paste circles in red, yellow, and light blue. Gently dip the tip of a wire into water or gum glue and push the wires into the circles.
2. Either trace the alef-beis letters onto the gum paste in contrasting colors to your circles or use cookie cutters to cut them out. Attach the letters to the balloons with a little bit of water or gum glue.
3. Let the balloons dry completely.
FOR THE CAKES
1. For the three cakes per tier, you can either bake two taller cakes for each tier and cut them into three thinner cakes, or you can bake three individual cakes, making sure they’re approximately the same height.
2. Let the cakes cool completely. It's better to freeze them or refrigerate them to make them easier to work with. If freezing, defrost slightly before assembling the cake.
3. With an offset spatula, put a dollop of white frosting on your bottom cake board. If you have a turntable, you can put your cake board on it to make it easier to frost. Place your first 8-inch cake on the board.
4. Pipe frosting around the top border of the cake and continue to pipe around inwards until the top of the cake is covered. Smooth out the frosting with an offset spatula.
5. Carefully place the next 8-inch cake on top of the first one. Frost as above. Continue with the last 8-inch cake. Add a thin layer of frosting to the top of the cake as well as to the sides. Smooth it out with a bench scraper or offset spatula. The frosting should cover the whole cake in a very thin layer. This is called a crumb coat, since it keeps cake crumbs from getting on the outside of your cake.
6. Repeat the above steps with the 6-inch cakes, then put both cakes in the fridge to chill. Once they’re chilled, it's a good idea to put another thin coat of frosting on the cakes and chill again. Now it’s time for a well-deserved break!
TO ASSEMBLE:
1. When you’re ready, cover the bottom cake with white fondant (or more buttercream frosting). Cut out strips of red fondant to make vertical stripes all around the cake.
2. Cut 4 straws to the height of the cake.Push them through the center of the cake. This will allow the second cake to sit on top of the first without the bottom cake collapsing, which we definitely don’t want to happen!
3. Cover the second cake with light blue fondant or frosting. Carefully place it on top of the decorated bottom cake.
4. Add a yellow border to the top and bottom of the blue cake. Alternatively, you can use little balls of fondant or yellow candy beads.
5. Using the plaque-shaped cookie cutters, cut out a larger plaque in red fondant and a smaller plaque in yellow fondant. Use letter molds for the birthday boy’s name or write it with food markers on the plaque. Glue components together and then glue decorated plaque to the cake using water or gum glue.
6. Using star-shaped cookie cutters, cut out white and yellow stars in different sizes. Glue them to the top cake.
7. Carefully push your elephant into the top of the cake. Push in the three balloons behind it.
8. Enjoy your creation and mazel tov!
(Originally featured in FamilyTable 642)
Oops! We could not locate your form.

