As a child, I was always enamored with succah decorations. Until today I recall how I was always so thrilled to look around our family succah and take it all in. Everything was so different from the usual — most of us don’t generally hang long, glistening chains across our dining room ceilings! With these memories in mind, I’ve always tried to create succah decorations with my children that will last in our consciousness for many years to come.
Here are a couple of ideas to enhance your Yom Tov!
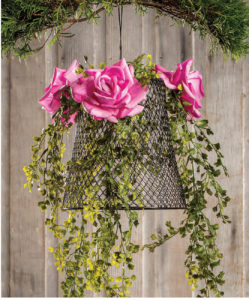
Hanging Baskets
These decorations were inspired by a faux bird cage I saw made out of chicken wire. However, as I stood in the gardening section of Lowe’s the other day, trying to choose between the different types and sizes, I suddenly decided that it was too dangerous to instruct people to work with the cut edges of the chicken wire, and so I left without buying any. Instead, I looked for a premade basket that would suit my needs. And here they are: The bird cage basket featured here is from Target, and the flower basket is a wastebasket from The Dollar Tree.
YOU WILL NEED
basket
strong string for hanging
branches
fake birds, flowers, and greenery (available at craft stores)
glue gun
The Bird Cage
Loop both ends of the string through the center bottom of the basket and knot the two ends together for hanging.
Using a glue gun, glue the birds to the branches.
Stick the branches through the basket holes from the inside of the basket. Glue in place.
Decorate with greenery and glue in place.
The Flower Basket
Loop both ends of the string through the center bottom of the basket and knot the two ends together for hanging.
Glue the greenery and flowers in place around the outside of the basket.
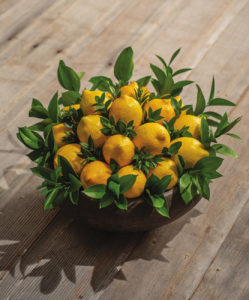
Leafy Esrog Bowl
This easy-to-assemble centerpiece will surely shake things up on your table this Yom Tov.
YOU WILL NEED
lemons
fresh or faux greenery (since myrtle leaves don’t last too long without water, I suggest using similar faux leaves instead)
bowl
half-ball of Styrofoam (when placed in the center of the bowl, it should come up a little bit above the sides of the bowl)
Place the Styrofoam ball inside the bowl. Stick the lemons all around the edge of the bowl. You may need skewers to hold them in place. (Mine stayed in place wedged between the edge of the bowl and the Styrofoam.)
Continue adding the lemons in rows until you reach the center of the Styrofoam ball.
Fill the spaces between the lemons with leaves.
Note:I used a bowl approximately 10 inches in diameter and 4 inches high, with a 71⁄2-inch diameter half-ball of Styrofoam. Exact placement of the lemons will depend on the measurements of your bowl and your Styrofoam.