Meat Guide

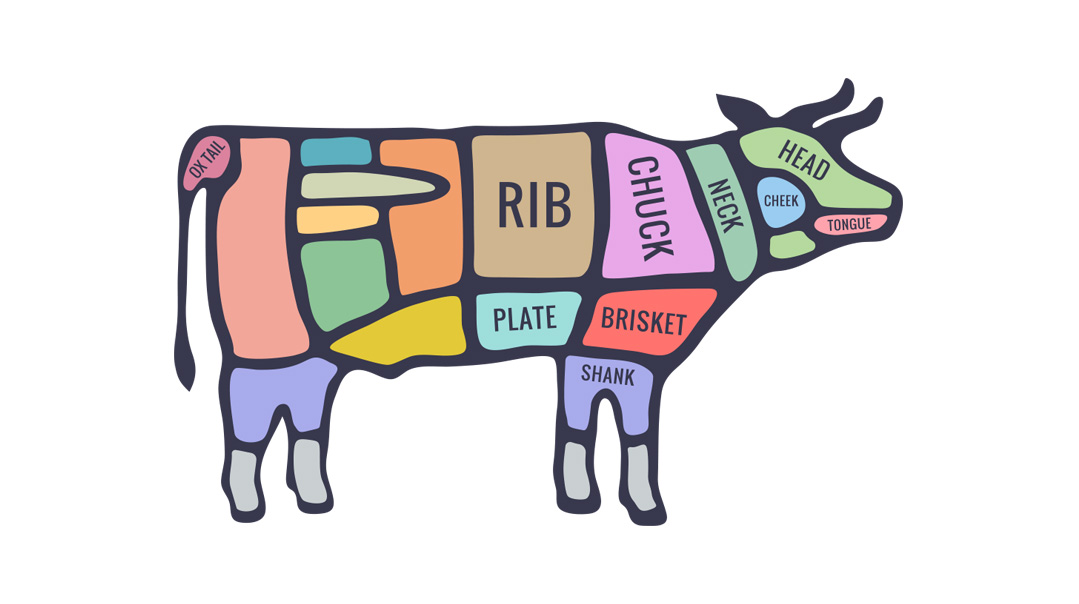
I get calls from friends all the time, asking how to prepare the meat they have sitting on their countertops. I'm always nervous to give them directions, because meat isn’t cheap — and also, they’re usually relying on it to be the star of the show at their meals. It’s not like ruining just a bunch of potatoes!
Explaining the different types of meat cuts, seasoning suggestions, and cooking methods and times would be a project of massive proportions, and there’s too much information to fit into just a couple of pages. Instead, I’ll tell you about some of my favorite cuts that I turn to again and again, because I know they will come out the way I envision.
LOW AND SLOW
Ribs
Bake ribs in a covered baking pan at 300°F (150°C) for about 3 hours or more, until very tender. To thicken the sauce, place it in a saucepan and reduce it by simmering until it reaches desired consistency.
Second-Cut Brisket
A number of years ago, if you would have asked me whether a first or second-cut brisket is a better cut, I would have said that the first cut is leaner and therefore better. But really, it takes a lot more skill, and sometimes even luck, to get a first cut just right. The second cut is fattier, and therefore almost impossible to ruin. To braise the meat, cook it on the stove top on low heat, with some wine, broth, mirepoix, and aromatics. A 3-lb (1½-kg) roast would get cooked for about 3-4 hours.
Chuck Roast
This cut is less expensive than a second-cut brisket, and therefore great for serving a large crowd. Season the meat generously. First sear the meat (see sidebar), then roast it in the oven, uncovered, at 300°F (150°C) for 40 minutes per pound of meat.
SEARING 101
There are three standard searing options to prepare a roast for oven cooking:
1. Sear meat in a cast-iron or heavy-bottomed stainless steel skillet for about 2 minutes on each side.
2. Set the oven to broil. Place meat as close as possible to the broiler flame. Sear meat on both sides for about 2-3 minutes per side.
3. For instructions on reverse searing, see Standing Rib Roast.
MYTH BUSTER
Searing meat is not done to lock in juices. Its sole purpose is for flavor. When it's dark brown, it means the Maillard reaction has occurred, and a lot of flavor has been released in the meat.
ON THE RARE SIDE
Split Minute Roast
My father introduced my family to this cut (also called a minute steak fillet), maybe 15 years ago, when he used to ask the butcher to take the vein out of an entire minute steak roast. Is he the reason it's such a popular cut these days? I'm going to say yes. Here I’ll share my favorite ways to make it. After searing (see sidebar), you can choose either of the following two options for roasting:
1. Preheat oven to 225°F (110°C). Place the skillet with the seared meat in the oven, and roast for 8 minutes per pound of meat. A 2-lb (1-kg) roast would get roasted for 15-18 minutes.
2. Heat the oven to 250°F (120°C). Place skillet with seared meat in the oven, and turn off the oven. Let meat sit in the oven until the oven cools off, about half an hour. To prepare the roast on the grill: Set one range of the grill to high heat, and another to low heat. Sear both sides of the meat on high heat for approximately 2-4 minutes on each side. Then transfer meat to the lowheat side of the grill and allow to grill for approximately 20 minutes.
NOTE: These methods work well with London broil and club steaks.
Brick Roast
For a brick roast (which is sometimes called a Delmonico roast), you use similar methods to a minute roast, but because it is a much thicker cut of meat, you would leave it in the oven for longer. First, sear the meat (see sidebar). Then preheat oven to 300°F (150°C). Place seared meat in oven, and roast for 15-18 minutes per pound of meat. Technically, for a brick roast, you can skip the searing, but I highly recommend it.
NOTE: This method also works well with rib fillet roast and French roast.
Standing Rib Roast
I recommend removing the bones so that you get a more even roast. You can place the bones alongside the roast in the baking pan. I also recommend using a reverse-sear for this cut (see below). It’s a good idea to use a meat thermometer for this roast. When the internal temperature reaches 125°–130°F (51°–54°C), remove the meat from the oven. Then heat oven for the reverse-sear. You can cook the meat with any of the following options.
1. Roast uncovered at 350°F (175°C) for 20 minutes per pound of meat.
2. Roast uncovered at 300°F (150°C) for 30 minutes per pound of meat.
3. If you like to cook your meat fresh on Yom Tov, put it into your 200°– 250°F (90°–120°C) oven for at least 3½ hours. This way, you can go to shul and come home to a perfectly done medium-rare meat.
To do the reverse-sear: Skip the searing before you cook the meat, and after it’s finished, sear it in the oven at 500°F (250°C) for 5 10 minutes or until browned. If you are cooking the meat before Yom Tov, use a stovetop sear option.
TIP: Utilize the knowledge that your butcher has to offer! No one knows times and temperatures for baking better than your butcher does. Use this valuable resource.
PRO TIP: Season meat the day before you’re preparing it, and let it sit in the fridge, covered loosely. This will help the roast age, and you’ll get a better crust on the roast.
(Originally featured in FamilyTable, Issue 645)
Oops! We could not locate your form.

